Image 1: Abstract overview of the setup
Working with docker in a local environment is great and can make a lot of dev things easier. With swarm you can even lump together all your machines and use all the ressource as one big view.
There are a lot of possibilities, like setting up a swarm cluster on AWS or Digital Ocean in minutes and then deploy your services. This is straightforward.
However adding some stuff to your /etc/hosts everytime is a bit annoying. Especially if you deploy different services to swarm. A lot of different services. On different swarms.. Overcomplicated..
Also, opening up everything or even a bit of everything to the world wide web is bad practice. Especially while experimenting. Not a good idea.
So how can one work in a comfortable way with e.g. multiple swarm clusters from a local machine and don’t care about all the configuration needed to secure the services and access them easily, e.g. under myservice.some.domain?
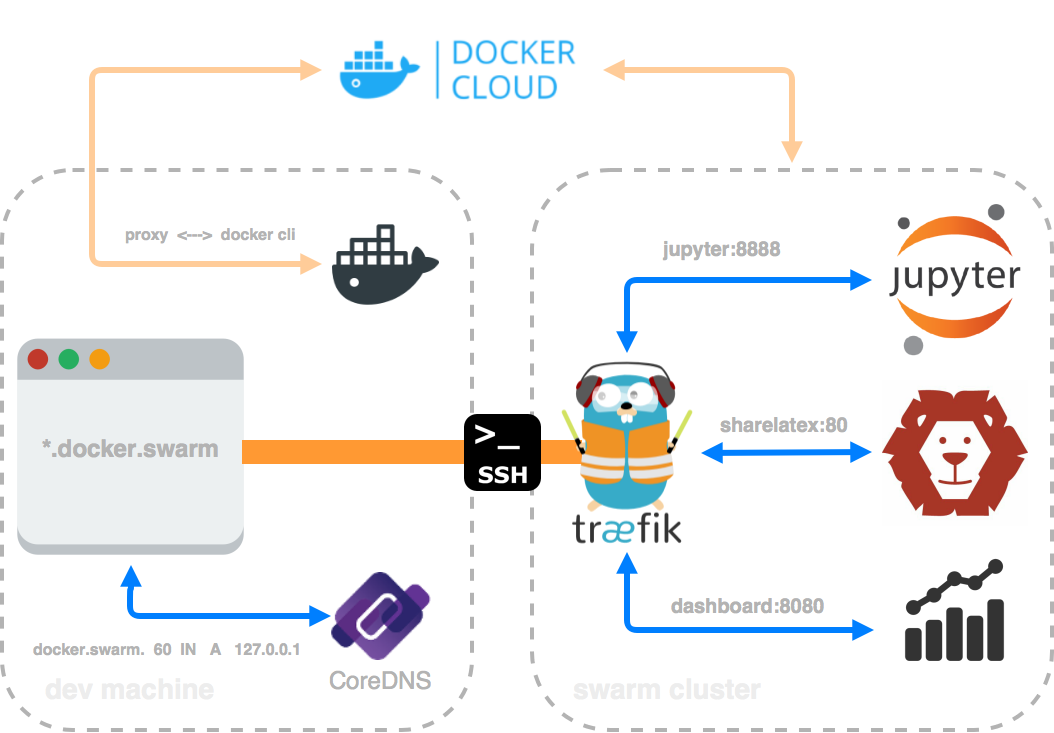
Image 1 shows a simplified setup of what I like to use. Very quick, secure and without annoying things. Usually one has SSH access to the machines. This should be sufficient to work with. Without opening any ports. One can either forward some local ports to the remote machine or even use VPN-over-SSH, e.g. sshuttle.
Most of the time I work with WebDev so using HTTP/S is sufficient for my tasks. Here you see a common example of port forwarding (local 80 to remote 80).
$ ssh -L 80:123.123.123.123:80 user@123.123.123.123 -N
So now I can simply access a web-service on the remote machine by just typing localhost into my browser. It’s really handy if you want to work with only one remote machine, but it will use port 80 locally. Hmmm.
If you don’t want it to occupy port 80 locally, you can just use sshuttle (as suggested above). So by running
$ sshuttle -r user@123.123.123.123 123.123.123.0/24
one gets the possibility to access the remote web-service (e.g.) on port 80 by just using the remote IP (123.123.123.123). Surely the more comfortable way is to add something like 123.123.123.123 some.domain to the remote server’s hosts file and then typing this url instead of the IP. Hmmm.
And what is if I have multiple services like webapp1 and webapp2 running on the remote machine? (Load balancing and subdomain routing will be discussed later)
Normally, we would have to add another line to the hosts file for every service (if we want to access them via a subdomain, like webapp1.remote.server). Could become really annoying..
Sure we could use some path-routing like /myblog --> webapp1 or /mysite --> webapp2. I don’t like such crap.
A much easier solution is to run some DNS server locally. A lot of people are scared of such ideas but there are some really really simple solutions for this. Like CoreDNS. And docker. Running CoreDNS with docker. No headache.
Of course we have to add some configuration (but it’s still quite simple though..)
So I run my local DNS this way:
$ docker run --rm -p 53:53/udp -v $(pwd):/coredns-config/ coredns/coredns -conf /coredns-config/Corefile
Here the container gets deleted on exit, port binding is simply set to dns and I provide some configurations (like Corefile).
The content of the Corefile is quite simple.
.:53 {
  file /coredns-config/docker.swarm docker.swarm
  proxy . 8.8.8.8:53 [2001:4860:4860::8888]:53
  prometheus
  errors stdout
  log stdout
}
It basically redirects everything except docker.swarm queries to a google dns. For docker.swarm domains it uses another config (/coredns-config/docker.swarm).
The content of this is quite simple, too:
$TTL 60
$ORIGIN docker.swarm.
@                   IN	SOA sns.dns.icann.org. noc.dns.icann.org. (
          2017042745 ; serial
          7200       ; refresh (2 hours)
          3600       ; retry (1 hour)
          1209600    ; expire (2 weeks)
          3600       ; minimum (1 hour)
          )
@                   IN A     123.123.123.123
*.docker.swarm.     IN A     123.123.123.123
Every subdomain and docker.swarm points to the remote server’s IP. Very simple.
While running the container one can test with dig if it really works:
$ dig docker.swarm

; <<>> DiG 9.8.3-P1 <<>> docker.swarm
;; global options: +cmd
;; Got answer:
;; ->>HEADER<<- opcode: QUERY, status: NOERROR, id: 20479
;; flags: qr aa rd ra; QUERY: 1, ANSWER: 1, AUTHORITY: 0, ADDITIONAL: 0

;; QUESTION SECTION:
;docker.swarm.			IN	A

;; ANSWER SECTION:
docker.swarm.		60	IN	A	123.123.123.123

;; Query time: 47 msec
;; SERVER: 127.0.0.1#53(127.0.0.1)
;; WHEN: Fri Sep  1 23:06:42 2017
;; MSG SIZE  rcvd: 46
You get the same by accessing a subdomain. To let your local machine use the local dns don’t forget to update resolv.conf (adding nameserver 127.0.0.1).
So now that big part is solved, too. If I deploy a simple webapp to my swarm cluster now, I can simply access it via the domain served by the CoreDNS container (docker.swarm).
The next problem is related to the ports.
If you run a container and bind some ports (e.g. host’s 8080 to container’s 80) you can’t bind another container to the same port. I.e. we have to access another webapp on a different port (e.g. docker.swarm:8080 rather than simply 80). This is somehow annoying.
To solve this we could use a good load balancer like traefik.
Please have a look at the Image 1 at the beginning of this post. Traefik will route our requests (e.g. jupyter.docker.swarm or sharelatex.docker.swarm) to the corresponding container. We only use subdomains. No ports. No headache.
I used a docker-stack.yml for traefik. This is how it looks like:
version: '3'
services:
  traefik:
    image: traefik:latest
    command: >
      --web --docker --docker.swarmmode
      --docker.domain=docker.swarm --docker.watch
      --accesslogsfile=/dev/stdout --logLevel=DEBUG
    volumes:
      - /var/run/docker.sock:/var/run/docker.sock
      - /dev/null:/traefik.toml
    ports:
      - "80:80"
      - "8080:8080"
    deploy:
      replicas: 1
      restart_policy:
        condition: on-failure
      placement:
        constraints:
          - node.role == manager
      labels:
        - "traefik.port=8080"
        - "traefik.backend=traefik"
        - "traefik.frontend.rule=Host:traefik.docker.swarm"
        - "traefik.docker.network=traefik_default"
Note that I provided the domain name in the command section. Next I placed the container on the manager node (dns container will resolve to the manager IP) and some labels. E.g. traefiks dashboard is accessible under traefik.docker.swarm. To deploy the stack simply run:
docker stack deploy -c docker-cloud.yml traefik
Some addtional notes: if you deploy traefik this way, a default network will be created (traefik_default). So when deploying other services you should add traefik_default to the service (as external network) and specify the label (like above). If you don’t do it you’ll probably get a timeout error as traefik will not be able to redirect the request.
We can test the whole setup by running a simple whoami container which will provide information like where the request has been redirected to (container-id) and others.
So I have a swarm cluster consisting of three worker nodes and one manager.
$ docker node ls
ID                            HOSTNAME            STATUS              AVAILABILITY        MANAGER STATUS
4v4pbtu27a8znsan86jf3uacr     docker-4            Ready               Active
kzanvv77u4v0ptk9p3zcvlzue     docker-3            Ready               Active
mhs4e6yw9io8pw9tnoxbgwcmq *   docker-1            Ready               Active              Leader
q07x2s9r640ia3vfkj75fhhzo     docker-2            Ready               Active
With docker service create --name whoami --network traefik_default --label traefik.port=80 --replicas 4 emilevauge/whoami I shoud get one container running on each node.
So here some details:
$ docker service ps whoami
ID                  NAME                IMAGE                      NODE                DESIRED STATE       CURRENT STATE
oiwp51fs9f4p        whoami.1            emilevauge/whoami:latest   docker-3            Running             Running 19 hours ago
rxr0w0ix7c9l        whoami.2            emilevauge/whoami:latest   docker-4            Running             Running 19 hours ago
kl1lmnfux6e6        whoami.3            emilevauge/whoami:latest   docker-2            Running             Running 19 hours ago
d7af62xugy4o        whoami.4            emilevauge/whoami:latest   docker-1            Running             Running 19 hours ago
Using curl we can see the requests are balanced to each container with round robin (everything can be configured with traefik):
(first request)
$ curl whoami.docker.swarm
Hostname: 2c049cd20104
IP: 127.0.0.1
IP: 10.0.1.16
IP: 10.0.1.5
IP: 172.18.0.8
GET / HTTP/1.1
Host: whoami.docker.swarm
User-Agent: curl/7.54.0
Accept: */*
Accept-Encoding: gzip
X-Forwarded-For: 10.255.0.2
X-Forwarded-Host: whoami.docker.swarm
X-Forwarded-Port: 80
X-Forwarded-Proto: http
X-Forwarded-Server: 4c8275a2a00c
X-Traefik-Reqid: 9912
(second request)
$ curl whoami.docker.swarm
Hostname: df827b31f25c
IP: 127.0.0.1
IP: 10.0.1.15
IP: 10.0.1.5
IP: 172.18.0.4
GET / HTTP/1.1
Host: whoami.docker.swarm
User-Agent: curl/7.54.0
Accept: */*
Accept-Encoding: gzip
X-Forwarded-For: 10.255.0.2
X-Forwarded-Host: whoami.docker.swarm
X-Forwarded-Port: 80
X-Forwarded-Proto: http
X-Forwarded-Server: 4c8275a2a00c
X-Traefik-Reqid: 10014
(Obviously the hostname listed above is not the ID from the service task’s output, it’s just the container ID)
So you have reached the last line - if you have any questions or suggestions, let me know :)